
Still Pictures in Video: The Photo MontagePlease call VideOccasions™ at 425-641-4811 or email us to discuss your project. |
 |
A photo montage is a collection of photographs arranged to tell some aspect of a life story. The photo montage is a celebration of life, whether it celebrates a birthday or anniversary, relives a family vacation, or evokes memories of a loved one gone. Photographs that have languished for years in old scrapbooks and albums can be shared with family members far and near when placed onto a DVD.
Although often consisting entirely of still pictures, there are no rules regarding what a photo montage should be, and many we have helped create at VideOccasions have contained a mixture of still photos, slides and video material. Photo montages are usually accompanied by music, and may have narration added too.
For more detailed information please read below.
| |||||||||
There are five steps in creating a photo montage.
 Upper Slaughter, UK Photo by VideOccasions |
 Upper Slaughter, UK Photo by VideOccasions |
Perhaps most importantly, talk to VideOccasions' staff at 425-641-4811 or email us before you jump into your project. We can help from the start to make this an enjoyable and rewarding experience for you.
There are five parts to the process: (1) determining who your audience will be; (2) sorting and preparing your pictures and slides for delivery to VideOccasions; (3) creating titles and captions; (4) selecting music to accompany the pictures; and (5) selecting a picture and creating text to be printed on the face of the completed DVD.
Your answer will determine length and content. Your family may be happy to sit through 45 minutes of pictures of Dad; guests at his company retirement party will probably get restless after 10 minutes.
Pictures that evoke strong memories in you may have little or no meaning to others. Choosing with care makes the difference between an o.k. photo montage and a great one.
Weed out pictures that don't contribute to the story.
Weed out pictures that are redundant. Six pictures of Baby Charlie, age 1, sleeping in almost the same position in his crib won't do much to advance your story. One excellent picture tells it all: Charlie was cute sleeping in his crib!
Number each picture and slide so that if you drop them, or get the story sequence confused while working with them, you can re-order them quickly. Use a pencil and write lightly on the back. Don't, under any circumstances, use a ballpoint or felt tipped pen: the ink can bleed through or offset and ruin your pictures.
Put your slides into slide trays, in the correct order.
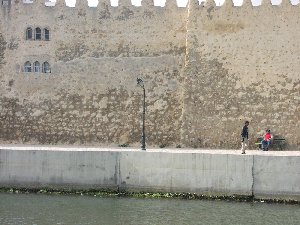 |
For example: your picture shows a huge rough-textured wall, with two people on the walkway. Does this photograph tell a story about
If it's about the wall and textures, you'll probably want us to frame the entire picture when we transfer it to video, so make a note of that. |
But if it's about the two men, you'll want to make a note to zoom in for a close-up, cutting out most of the wall.. | 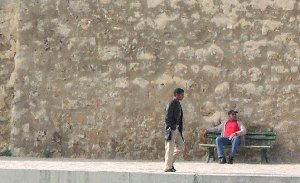 |
The choices here are yours to make. We can often make poorly composed photographs look like works of art, and sometimes even hide damaged portions of a picture. You're the Producer, though. Much of what you're paying for is VideOccasions' artistic experience and judgement, but ultimately it's your project and only you can make decisions about what's to be included in the piece.
 |
If your intention is to show your photo montage for friends and family, and perhaps share it with out-of-towners by sending them copies of the DVD, you're probably o.k. in using music you've purchased on CD and iTunes.
This music is protected under U.S. copyright law, however, and cannot be legally placed on the internet, even though you bought it. It is highly likely that should you decide to upload your completed photo montage to Vimeo, YouTube or Facebook you will be asked to remove it: you're in violation of copyright law. |
Others, however, save money by scanning their photos themselves and bringing us a CD with image files.
Very Important If You Scan Your Photos and Slides2. Scan your photos carefully. Square them up on the scanner. Don't leave white edges around the pictures. Scanned images that we have to correct cost you money! 3. Put the scanned photos onto a CD, flash drive or hard drive as .jpg files. As you save each image number the files like this: 0001ourbaby.jpg, 0002billy.jpg, etc. Do not number them 1.jpg, 2.jpg, etc. The leading zeros will ensure that when we transfer the pictures to our computer they'll be in the order in which you want them used in the photo montage. 4. For a DVD, select a label picture. Give some thought to what you'd like printed on the front of your DVD. We can print an appropriate picture and text directly onto the disc. Remember: You're working with a round object that has a hole in the center, so find a couple of pictures that lend themselves to this format. Let us know the image number you've chosen. |
Call VideOccasions to make an appointment, when you have everything ready. We'll have you bring all your materials to us so we can get them into our computer.
We'll call you once we've completed a "rough cut" and have you come in to review the project and make any changes you feel necessary. We'll reserve an editing room for you, where one of our staff will be on hand to help you make this a project everyone in the family will long remember.
Finally, we'll create a DVD of the finished work, or transfer it to a flash drive or to your hard drive. Plan to make copies of your finished project at VideOccasions, so each member of the family, no matter where they are, can share these memories with a professionally created, beautifully illustrated DVD.
Because of the highly individual nature of each photo montage it isn't possible to give a firm cost for a project. The amount of image enhancement, movement on and between pictures and the unique requirements of matching pictures to music will affect the cost of each project. Changes and the addition of pictures as the project develops will also increase the cost.
To help you estimate costs, however, the following guidelines are given:
Editing is billed at $80 per hour.
Remember: These are only estimates! Many projects cost less; some cost more.